Dioramas are a great way to display small scenes and can be made from various materials. You’ll need basic supplies, including a base, scenery, and figures. You can also add lighting and other details to create a realistic scene. Follow these simple steps to create your own miniature diorama!
This article will provide an overview of the supplies and steps needed to create a miniature diorama.
What are dioramas, and what can they be used for?
Dioramas are miniature models of scenes, usually in three dimensions. They can be used for various purposes, such as displaying a small scene realistic way or telling a story. Dioramas can range from large battle scenes created on bases that are tens of meters large to small, delicate models contained in glass domes.
What supplies will you need?
To make a diorama, you will need some basic supplies. These include:
- Wooden Base Board.
- Modelling Foam.
- Hot Wire.
- Hot Glue.
- Toothpicks.
- Mod Podge.
- Model Ink.
- Primer.
- Your Choice of Paint.
- Model Scenery.
- Models.
How to make a miniature diorama?
Place your wooden base.
Place your board on a work surface. Draw out your scene on the board with a pencil. This will help you plan the placement of your scenery and figures. You will want to use a board at least 2 feet by 2 feet (60 cm by 60 cm). There is no harm in creating a diorama smaller or larger than this, but we have followed these dimensions in the example.
You will want to ensure that your wooden base is sturdy enough to support any scenery or figures you intend to place on it. A thin base may warp or bend under the weight of your materials.
Plan Your Scene
Once you have chosen your scene, it is time to start planning the placement of your scenery and figures. Begin by sketching a basic outline of your scene on the wooden base. This will help you determine the best placement for your scenery and figures.
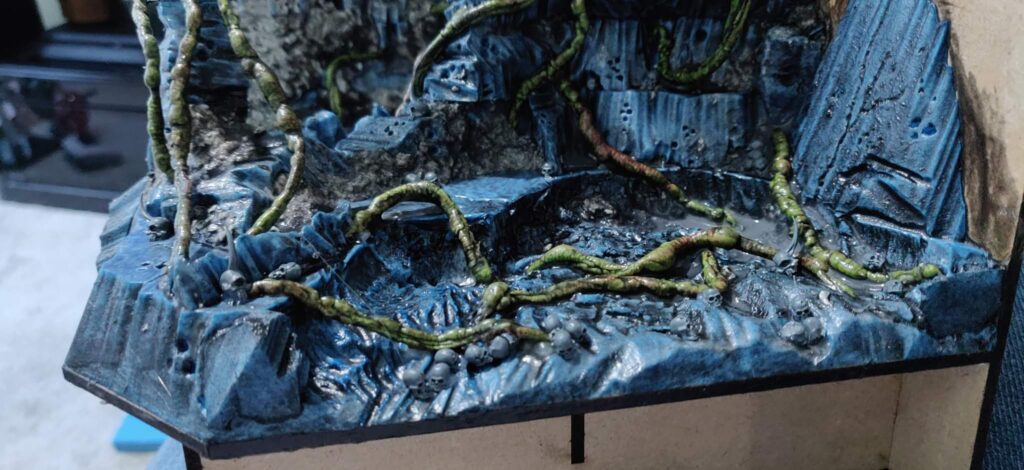
We have chosen to create a scene that oozes Nurgle’s corruption in the example. We have sketched a small pool of water in the centre of our base, with a few Nurglings frolicking nearby. We have also sketched some trees and bushes to add more interest to the scene.
As you sketch out your scene, keep in mind the following:
- The height of your tallest piece of scenery. This will determine the overall height of your diorama.
- The placement of your figures. You will want to ensure they are not obscured by scenery or placed in awkward positions.
- The size of your base. This will determine the size and number of scenery pieces you can include in your diorama.
Add Modelling Foam
Once you have planned your scene, it is time to start adding scenery. Begin by adding modeling foam to your wooden base. This will provide a foundation for your scenery pieces and help them stay in place.
Use a hot wire or hobby knife to cut the modelling foam into the desired shape. In the example, we have carved a pool out of our foam to match the one we sketched earlier.
Leave enough space around the edge of your scene for figures and other details. In the example, we have left a few inches of space around the edge of our pool.
Carve out any other features you want to add to your scenes, such as rocks, trees, or bushes. Leave enough space between each piece of scenery for figures and other details.
Add Hot Glue and Toothpicks
Once you have carved out your scenery pieces, it is time to add them to your wooden base. Begin by adding a layer of hot glue to the back of each piece. Then, place the piece on the wooden base and press it into place.
For larger scenery pieces, you may need to use toothpicks to help support them. Add a few drops of hot glue to the back of the piece, then press it into place on the wooden base. Stick a toothpick into the hot glue to help support the piece.
We have added our pool and mountains to the wooden base in the example. We have also added a few trees and bushes, using toothpicks to help support them.
Continue adding scenery pieces to your wooden base until you are satisfied with the results. Remember to leave enough space between each piece for figures and other details.
Cover the landscape in Mod Podge
Once you have added your scenery pieces, it is time to add details. Begin by covering the landscape in a layer of Mod Podge. This will help keep your scenery pieces in place and add texture to the landscape.
TOP TIP: To ensure you gain full coverage of the complete scene with mod podge, add a small amount of ink and mix the liquid. This will allow you to see where you have applied it to your model. Mod Podge dries clear, and you may miss an area of the scene which you want to avoid.
If you have never used Mod Podge before, we suggest you check out our article about how to make the most out of this wonderful modelling resource.
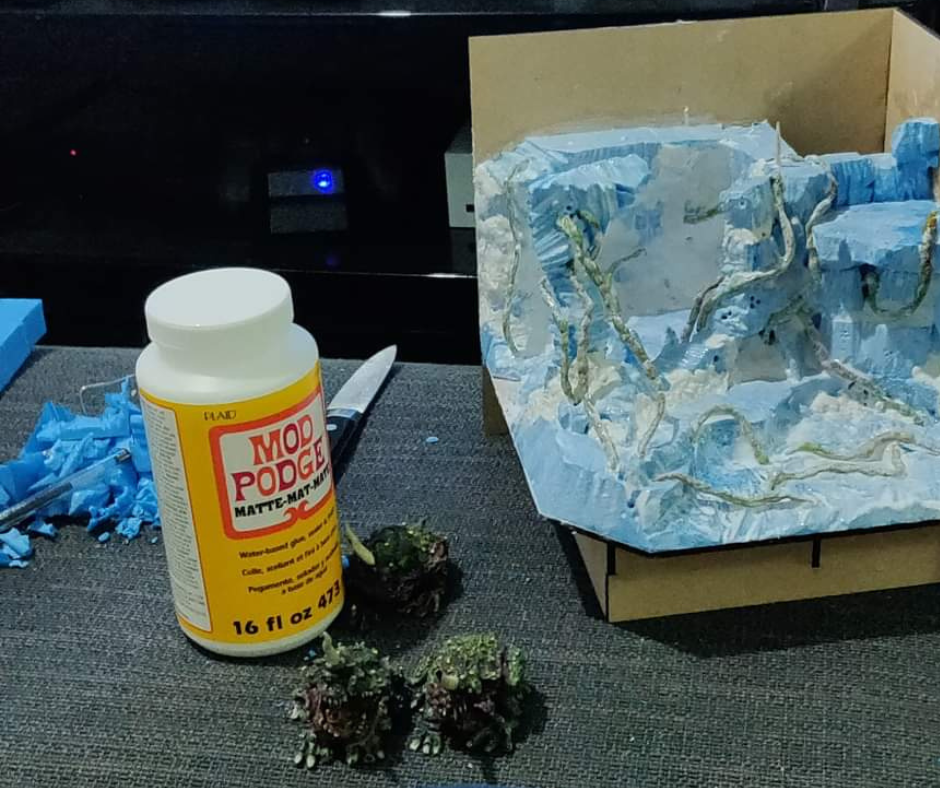
Applying Mod Podge is a crucial step as if you do not seal your landscape, the primer and paints you use in the later stages will eat the foam. You have been warned.
In the example, we have applied a layer of Mod Podge to all the foam structures we have created. Let the Mod Podge dry completely before moving on to the next step.
Add sculpture mould
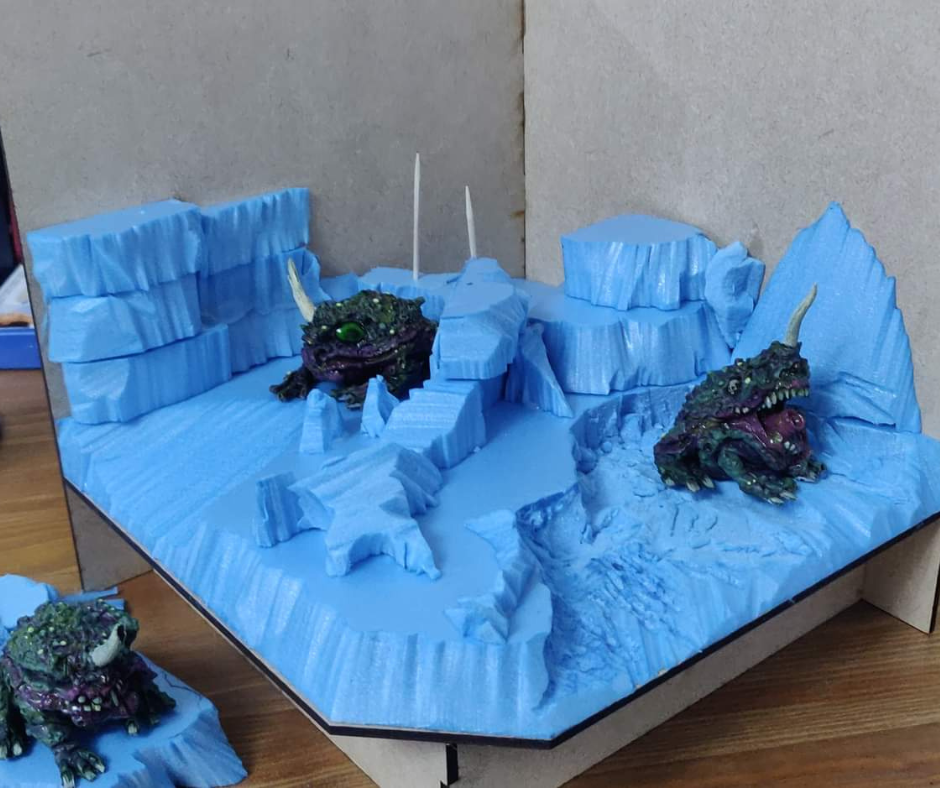
Now add sculpture mould to cracks and crevasses between connecting foam scenery. You can also use sculpture mould to add details such as rocks, vines, and roots to your landscape.
Sculpture mould is a great way to add texture and interest to your landscape. It is also very easy to use – simply press it into place and let it dry.
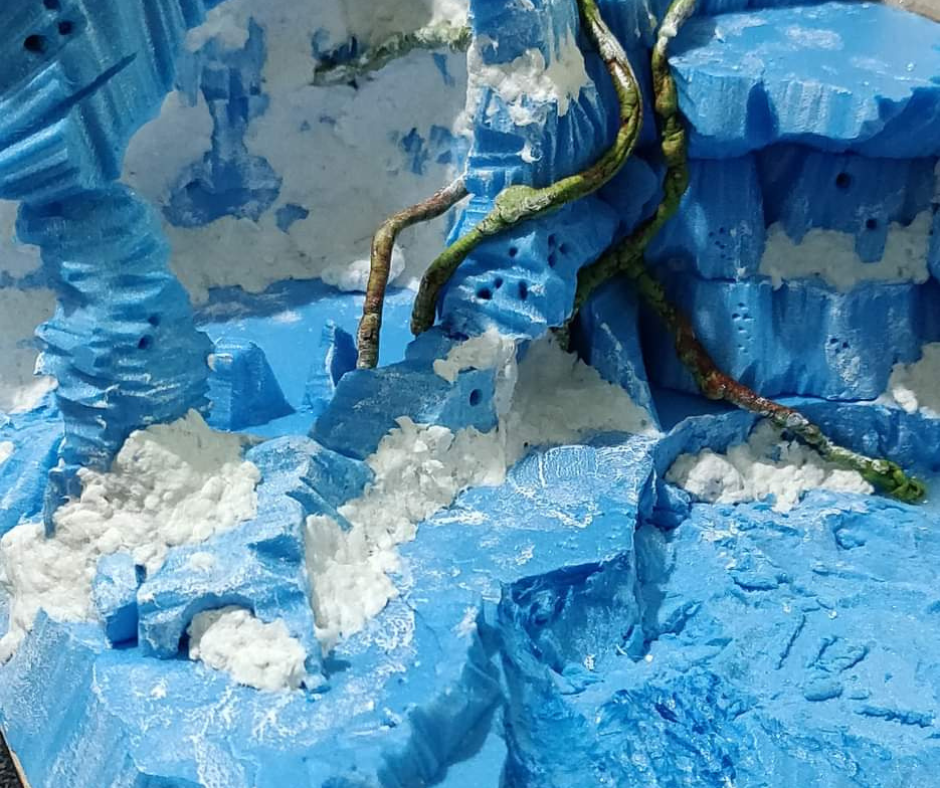
In the example, we have used sculpture mould to add rocks and roots to our landscape. We have also added a few vines to the sides of our pool.
Let the sculpture mould dry completely before moving on to the next step.
Add a Layer of Primer
Once the Mod Podge has dried, it is time to add a primer layer to your landscape. This will help your paint adhere to the landscape and create a more even finish.
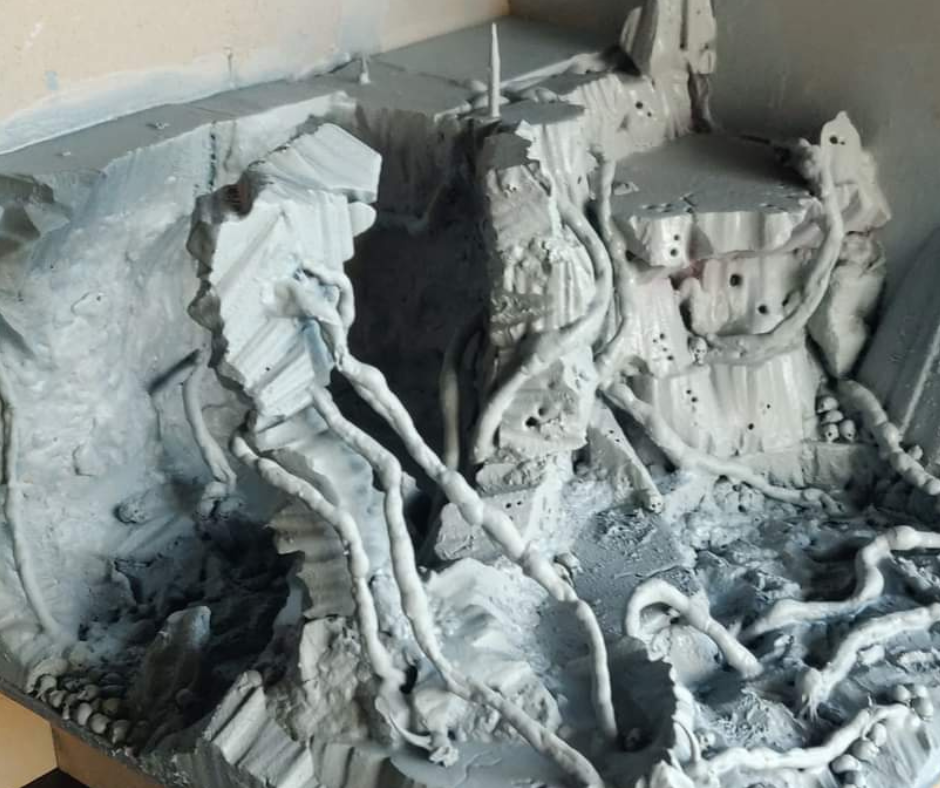
In the example, we have applied a layer of white primer to our landscape. Allow the primer to dry completely before moving on to the next step.
Add your base coat of paint.
Once the primer has dried, it is time to paint your landscape. Begin by adding a base coat of paint to all the scenery pieces. We used light brown paint for our base coat in the example.
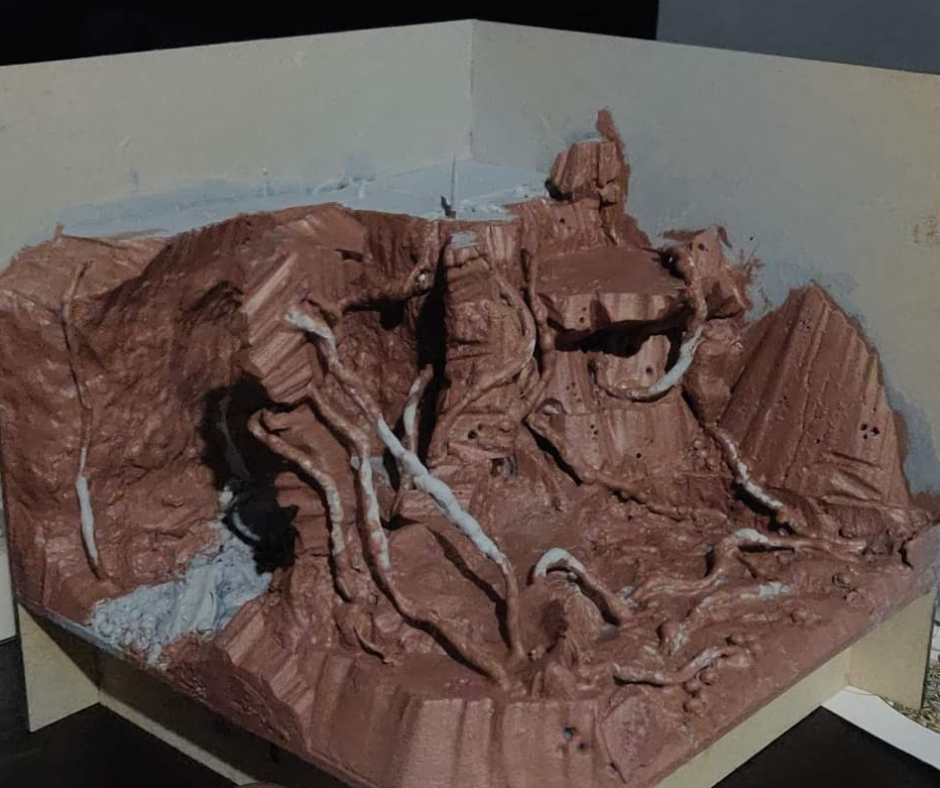
Allow the base coat to dry completely before moving on to the next step.
Add details with paint.
Once the base coat has dried, it is time to add details. Begin by painting any large features, such as mountains or trees. In the example, we have used dark brown paint for our mountains and light green paint for our trees.
Next, add any smaller details, such as rocks or bushes. In the example, we have used dark grey paint for our rocks and dark green paint for our bushes.
Finally, add any final details, such as grass or water. We have used light green paint for our grass and blue paint for our water.
Allow the paint to dry completely before moving on to the next step.
Add figures and other details.
Now that your landscape is complete, it is time to add the finishing touches. Begin by adding any figures or details you want to include in your scene. In the example, we have added a few trees and bushes.
You can also add lighting and other details to create a realistic scene. Follow these simple steps to create your own miniature diorama!
With these simple steps, you can create your own miniature diorama! Be sure to share your finished product with us in the comments below.
What kind of foam should you use for dioramas?
There are various types of foam that can be used for dioramas below, we have listed a few that we use:
Foamboard / Foamcore – this is a lightweight, stiff material that is easy to cut and shape. It is ideal for larger dioramas as it can be cut into large pieces.
XPS Foam – This is a rigid foam that is easy to work with and can be carved into shapes. It can be bought in sheets or blocks and is available at most hardware stores.
EPS Foam – This is a softer foam that is also easy to work with. It can be bought in sheets or blocks and is available at most hardware stores.
Styrofoam – This is a lightweight foam that is easy to cut and shape. It can be bought in sheets or blocks and is available at most hardware stores.
What glue do you use for dioramas?
The glue you use will depend on the materials you are using for your diorama. We recommend using a hot glue gun for most applications as it is quick and easy.
Large Areas – We recommend using a hot glue gun, especially for structural foundations and large sections of scenery. You can also use toothpicks to provide increased support for these sections. You can also use PVA and white glue as this can be easily spread over large areas.
Small Areas – For small areas, we recommend using a strong adhesive such as E6000. This glue can be found at most hardware stores. You can also use super glue and white glue for these areas.
Tips for creating realistic scenes in your diorama
Now that you know how to make a diorama, here are some tips for creating realistic scenes:
- Create a sense of depth by adding distant mountains or clouds.
- Include different levels, such as a hill or a platform, in your scene.
- Use trees, bushes, and other plants to add realism.
- Add lighting to your scene for a realistic effect.
- Place your figures in the scene so they appear to interact with their surroundings.
By following these simple tips, you can create a miniature diorama that is realistic and eye-catching!
How to display your diorama once it’s finished?
Once you’ve finished creating your diorama, you’ll need to decide how to display it. There are several ways to do this, such as:
- Placing it on a shelf or in a cabinet.
- Hanging it on a wall.
- Creating a stand to display on a table or desk.
Whatever way you choose to display your diorama, ensure it is securely attached so it doesn’t fall and break. You want to place the diorama in a largely undisturbed area to ensure that there is no damage to your new masterpiece from passersby.
Final Thoughts
Dioramas are a great way to display small scenes in a realistic way. Following the steps and tips outlined in this article, you can create your own realistic diorama. So, get creative and have fun!